
Quikscribe
Downloader
Program
Importing Files from Portable Digital Recorders
The
Quikscribe Recorder has integrated software and hardware drivers to support
professional digital recorders from Philips, including the DPM 9600 model.
However, just
about any other digital recorder may be used if it can connect to the computer
and be recognized as a “removable storage device” (with a drive letter such as
E:, F:, G:, etc.
The
Quikscribe drivers provide a pop-up panel (the “Quikscribe Downloader” that
displays the list of files on the recorder, and allows you to easily transfer
the files to the Quikscribe Recorder or to the Quikscribe Player.
When the recorder is connected to the PC using the USB
cable or the docking cradle, the Quikscribe
Downloader panel will appear, as in the following example:
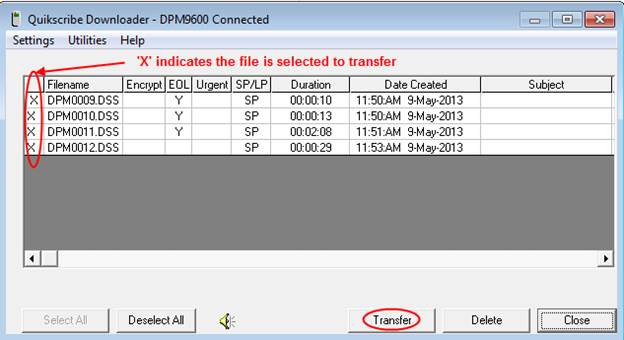
The
process can be as simple as clicking the Select
All button, and then the Transfer button.
Depending
on the Device Settings, the files can be placed on the computer in the author’s
Drafts folder in QS Recorder, or the files can be sent directly to the desired transcription
destination.
The
Device Settings also has an option to automate the process, so that by simply
connecting the portable recorder to the computer, the files will be transferred
automatically to the desired destination.
If Using the Philips Digital Pocket Memo:
The drivers are built into the software and
Quikscribe Downloader will recognize the device.
If using a different portable recorder (such as Olympus, Grundig, or others):
You will need to select the option under
Settings for “Use Disk Integration”
. 
Files may also be
sent directly to transcription when downloaded – please review the
following options for Settings:
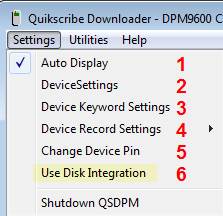
1. If Auto Display is checked, the Quikscribe
Downloader panel appears when the recorder is connected to the PC. If Auto Display is not checked, the Quikscribe
Downloader panel may be opened from the taskbar by clicking the
icon. Recommended
setting: check to enable the Auto Display function.
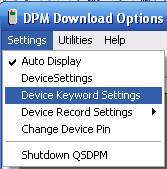
2. Device Settings
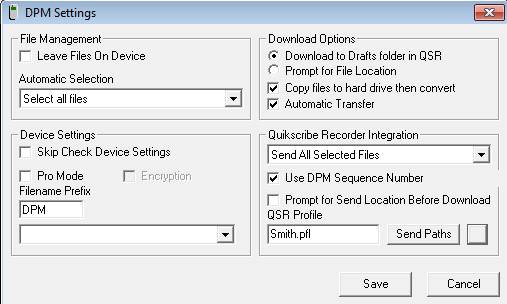
Device Settings allows you to set the following options
for the DPM:
File Management Options

Leave Files on Device: If the
setting is checked the files will remain on the memory card after
download. You may want to check this
option as you test downloading files, but generally you would not check this
feature since the dictation files would accumulate on the memory card.
Automatic Selection provides
a list of the following options:
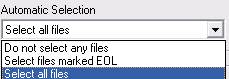
- Do not select any files (displays files so that each one can be
selected)
- Select files marked EOL (selects
only files closed and marked with EOL function on the DPM unit)
- Select all files
(recommended)
Notice in the files listed above in the “Quikscribe
Downloader” panel that one file has “X” in the “EOL” column. A file marked EOL indicates that the author
has pressed the New File button on the DPM after recording a dictation. This signifies that the dictation is
finished. You may select individual
files to transfer to the PC by clicking anywhere on the line where the name of
file is displayed, or you may simply Select All to mark all the files for
transfer.
Device Settings
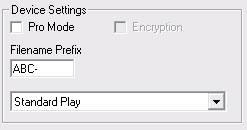
Pro Mode enables the
advanced features of the .ds2 file format (instead of .dss), including high
quality sound recording and file encryption.
You must have Pro Mode selected in order to also select encryption.
Encryption enables file encryption on the memory card. This security feature ensures that files can
only be played on the device itself, or if they are transferred to the PC using
the Quikscribe Recorder software in the same organization. The encryption
feature requires the use of the QS Manager software to define the encryption
key. If the memory card is removed from the
device, or files transferred from the device without the proper workflow
process, the data will not be accessible to an unauthorized user. Pro
Mode must first be selected in order to engage the Encryption feature.
Filename Prefix provides identification of the file name created on
the DPM. Please note that filenames are
converted to the filename prefix defined in the QS Recorder user profile when
they are downloaded. As the serial
number of the DPM is used to match the DPM to the QS Recorder user profile, it
may be helpful to use the DPM serial number as the Filename Prefix on the
DPM. (The serial number is located
inside the battery compartment.)
The Audio Quality setting may be set to
LP (long play), SP (standard play) or QP (high quality play). QP is available only if Pro Mode is
enabled. Please note that a higher sound
quality setting will result in larger file sizes. If you are using voice recognition software
as part of the transcription workflow, then QP may produce better results than
SP.
Download Options
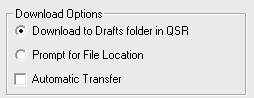
“Download to Drafts folder in QSR”
transfers files to the author’s Draft folder in Quikscribe Recorder. This allows files to be opened individually
for review or modification, to include text, image, or file attachments, and to
specify the desired Send destination.
“Prompt for File Location” is no
longer used – do not select.
Automatic Transfer provides the option to automatically download and transfer files from
the DPM unit when the unit is connected with the PC. The other Device Settings will apply to the
transfer rules to download the files to the QSR Drafts folder or to send the
files directly and immediately to the desired transcription destination.
Quikscribe Recorder Integration
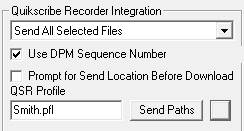
The drop-down list provides the options to just
download files to the local PC, or to download and send the files directly and
immediately to the desired transcription destination:
- Download Selected Files
(download files only to QSR Drafts folder; do not send to transcription)
- Send Only Files Marked EOL
- Send All Selected Files
“Send All Selected
Files” will download and send all files to transcription, whether or not
they have the EOL stamp from the DPM.
- converts each file from the
.dss/.ds2 format to IAF
- renames and numbers each
file according to the author’s profile settings
- produces a backup copy of
the .dss/.ds2 file in the Import folder
- sends the file directly to
the (default) transcription location specified in the author’s QS Recorder
profile
- produces a backup copy of
the sent file and stores it in the author’s Sent folder in QS Recorder
Use DPM Sequence Number is useful when the author is
using more than one location to download files.
This will use the number sequence generated by the DPM instead of the
number sequence generated by the QS Recorder user profile.
Prompt for Send Location Before Download provides
the option to select the transcription destination each time you connect the
DPM unit. A prompt will appear showing
the send destinations. Upon selection,
the files will be downloaded and sent to that location.
QSR Profile
Select the appropriate QS Recorder user profile for
the DPM unit. Once selected, the serial
number of the recorder device is matched to the QS Recorder user profile. Then the recorder may be connected to any PC
with QS Recorder and the user profile will be matched automatically for the
download transfer. The Quikscribe
Manager software provides centralized administration of the QSR user profiles
and also the portable recorder user profiles.
3. Device Keyword Settings
You can
configure keywords on the DPM to help identify characteristics of each file. These characteristics may be the Author Name,
Subject, Matter No., Document Type, and Document Name fields (as used in
Quikscribe), or may be other keywords defined according to other preferences or
requirements. The QS Enterprise Manager
provides tools to define and maintain keyword settings throughout an organization.
To manage
keywords on the DPM:
a. Connect
DPM to PC and power unit on.
b. In DPM Download panel, select
‘Settings’, then ‘Device Keyword Settings’
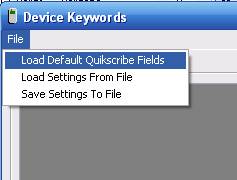
c. Select
‘File’, and then ‘Load Default Quikscribe Fields’ to populate the table with
the Subject, Matter No, Doc Type and Doc Name fields stored in Quikscribe.
Note:
The DocType and Matter No fields may be
populated in the QSR global template recorder.pft
using the QSR Profile Editor, which passes to all user profiles. This streamlines the data population for each
user profile, and the entries may be passed from the PC to the DPM using the
‘Load Default Quikscribe Fields’ feature.
The advantage
of populating the DocType field is that the author
can select the document template to use with the dictation file. This instruction is passed to the QS Player,
and QSP automatically opens the document template based on this entry for DocType. Please
refer to the instructions on using document templates for more details.
d. To edit
any entry, just double-click on the table entry. You may also use custom field name if you
prefer that (double-click on the field name to change it). For example, instead of using the field name
‘Subject’, you may change the field name to ‘Author’, and place an entry in the
column to hold the author’s name. This
can be used to identify the owner of the DPM in case it’s lost or needs to be
tracked.
e. Click the
‘Save’ button to save the settings to the DPM.
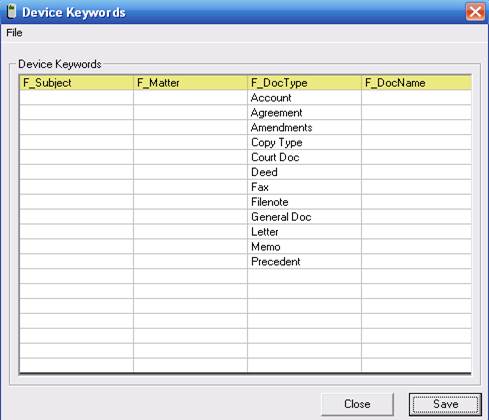
The example
below shows the default Quikscribe fields already loaded:
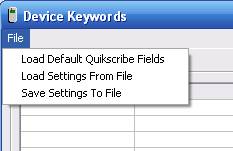
6. Once the
Keyword fields are populated, you may select ‘Save Settings to File’ to save
the defined keywords to a file. You can
then retrieve the defined keyword settings using the ‘Load Settings From File’ menu option to populate the keywords on another
DPM device.
4. Device Record Settings
This
menu item simply verifies the record settings that are on the actual DPM:
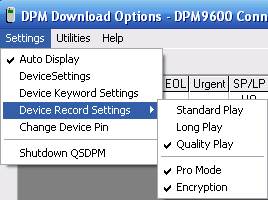
You still use
the Device Settings panel to change
the settings in the DPM profile. The Device Record Settings verifies the
settings on the unit after it is connected to the PC.
5. Change Device PIN
You may assign a 4-digit PIN (personal identification
number) code to the DPM 9600 if Pro Mode is enabled. Select 4 digits between 0 and 9 as the PIN
code. Once the PIN is set on the DPM,
then a prompt will appear on the display (when the unit is powered on) to enter
the PIN code. Recording and playback is
prevented unless the proper PIN code is entered. To remove the PIN entry,
replace the Password with four (4) blank characters.
IMPORTANT!!!
Recovery of a lost PIN code is only possible if the QS
Manager software is installed and configured properly for the organization
prior to setting the PIN. Otherwise the
DPM may need to be returned to the factory to remove the PIN security block.
We recommend that you DO NOT attempt to set the PIN
without using the QS Manager.